


Benefits and process of Scan to BIM services
March 12, 2018
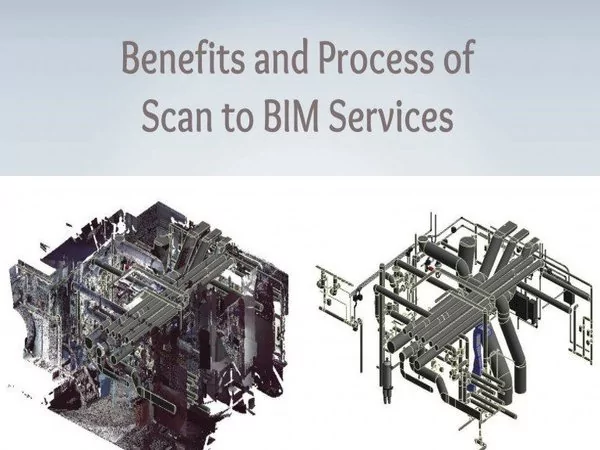
The AEC industry has adopted quite a few interesting and innovative technological advancements to enhance its productivity over the years. The important one among them is Scan to BIM. We can see the application of Scan to BIM process extensively in renovation projects. Here data is derived with the help of laser scanning technology and later productive 3D BIM models are developed using these data.
As-built data deprived of 3D laser scanning captured with the help of laser scanning equipment assist in generating accurate 3D BIM models faster as compared to the traditional methods. External and internal laser scanning helps to build accurate 3D surveys further assisting in creating intelligent 3D models.
BENEFITS OF 3D SCAN TO BIM:
- Scan to BIM helps in improved transparency, communication, and collaboration.
- BIM model generated from the scan data allows more reliability & quality assurance
- Reduces the construction cost
- Scan to BIM eases project alterations and assists in faster decision making
- Using BIM throughout the building process leads to better sustainability in the project
- The virtual creation of BIM model from scan data helps eliminate costly mistakes during construction
Building data are extracted during the scanning process using highly effective laser scanners. When laser beams get back the hardware and they were directed towards the structure, in the beginning, points clouds are acquired.
SCAN TO BIM WORKFLOW:
- Modelers should open Revit first to include point cloud data in Revit project
- Once the modelers get accessible to Revit, converting the available scanned data into effective file formats is the next procedure.
- BIM Modelers are generally covert raw scanned data into point cloud files using Autodesk® ReCap.
- Models should transform raw scanned data into appropriate cloud files during the indexing process.
- After the indexing process, the raw scanned data is transformed into .rcp and .rcs file formats.
- So, users can link the point cloud files within a Revit project soon after they get .rcp and .rcs file formats.
- Countless .rcs files (Reality Capture Scan files) are included in an .rcp file (Reality Capture Project File).
- So, cloud files modelers should click ‘Insert tab’ first and then ‘Link Panel’. After that, they can select ‘Point cloud icon within Link panel.
- After selecting Point cloud, the modelers have to identify the files which should be linked to the project.
- BIM modelers are allowed to pick either a .rcp extension file or a .rcs extension file, depending on their requirement.
- BIM Models should use Point Cloud tool in order to insert the file into Revit Project.
- Once the modelers select a suitable file, then they have to focus on how to position a file in the project.
- Modelers can position a file in the project either by selecting Auto-center to center option or by using an option among Auto – Origin to Origin, Auto – Origin to Last Placed, and Auto –By Shared Coordinates.
- Once the modelers choose an effective file positioning option, then they can link the point cloud file in the project by clicking on “open’.
If the modelers follow the above-described steps effectively, they can easily and efficiently link the point cloud files into Revit Project.
With BIM implementation the fundamental techniques of operation in the construction industry are rapidly changing. It is believed that BIM’s feature of openly sharing information would derive substantial benefits in cost and value proposition. Renovation or refurbishment BIM projects could be more accurately and comprehensively completed with the help of Scan to BIM method of capturing 3D survey data.
To know more about Scan to BIM Download our Case Study where Excelize offered its Scan to BIM Services for a more than 60 years old Heritage Building in the USA.
Latest Posts
-

Paris Olympic 2024: Digital Twins Technology Will Make Olympic Games More Efficient
July 24, 2024
-

How Anant Ambani’s Wedding at Jio World Convention Centre Showcased the Modern Indian Architecture.
July 18, 2024
-

Bihar Bridge Collapse Shocks Nation: Structural Failures and Safety Concerns
July 8, 2024
-

BIM Coordination Services in Boston: Advanced BIM Solutions for Construction
July 1, 2024
-

T20 World Cup 2024: Nassau County Cricket Stadium Built in Just 100 Days Thanks to Modular Construction Technology.
June 14, 2024